Text & Images:/ Andrew Steel
Office soundproofing may at first sound like an oxymoron when you think of open plan offices, with workstations and partitions that only come up to waist or shoulder height. Whether they are call centres or administration centres, there is literally no soundproofing between workers and we are all familiar with the background chatter that is audible when you call such a workplace.
These places often have meeting rooms and a boardroom which do need to be soundproof though, and very often they are not. It’s not until the MD or CEO is in a meeting in one of these rooms and can hear everyone else, which means they can probably hear him, that someone realises that such rooms need soundproofing.
Of course the boss usually wants it fixed immediately but in a structure that was not built with soundproofing in mind, it is not always that easy. To get some idea of why, we need to understand the basic mechanics of soundproofing. Once the key elements of good soundproofing are understood, it becomes clear where most of these rooms fail.
CRITICAL MASS
The first and simplest element of sound proofing is mass. Quite simply, the more mass in the wall, the less sound goes through it. Mass doesn’t provide ‘flat’ isolation though, but slopes downwards providing less isolation at low frequency. Straight away we can see that the common office wall may be lacking in this regard. They are usually light timber or steel studs with a layer of 10mm plasterboard each side. This is just enough to make the lightest, cheapest wall and not heavy enough to stop much sound.
Since it provides less isolation at low frequency it is why loud male voices are often heard through them very easily. Quite naturally the first pass at a fix is to add of mass in the form of more plasterboard. Adding a layer of plasterboard to each side will add about 6db more isolation. For reference, we need a 10 or 12dB reduction for most people to perceive the change as being half as loud.
The next thing that needs to be considered is the cavity that is formed between the two sheets of plasterboard. This will resonate just like a drum when sound hits it and the frequency at which it resonates will pass through the wall very efficiently.
The solution is to damp the cavity with some form of porous absorber such as glasswool, polyester or rockwool. The effect of doing this is to minimise the resonance of the cavity: just like putting a blanket in a bass drum. The absorber doesn’t really stop any sound passing through it but since sound travels at 340m/s, it bounces between the sheets of plasterboard so many times that the resonance is damped and the soundproofing is improved.
FILLING THE CAVITIES
Office walls are commonly built without insulation in the cavity and it is not so easy to add afterwards, as a layer of plasterboard needs to be removed. Adding insulation in the cavity can add another 6dB of isolation though, so it is worthwhile. Holes or slots can be cut in the wall and insulation can be slid in, leaving only a small amount of patching to do. If another layer of plasterboard is to be added, this is even less of an issue.
Adding more plasterboard and insulation in the cavity may add 12dB of extra isolation, but none of it is worthwhile if the third requirement is not met – air tightness. Very small gaps, cracks and holes can reduce the isolation by 12dB or more so attention must be paid to sealing the room up. A well soundproofed room would not leak water if it were able to be filled up! This means not only making sure all joins in the plasterboard are sealed up, but also making sure any penetrations are taken care of as well.
Things like power points, telephone and data points, down lights, and air conditioning ducts are all penetrations that will allow air, and hence sound, to pass through a wall or ceiling. In the case of power points the sound travels into the wall cavity and out of another power point. For ceilings the sound will go up into a light fitting or duct, across the ceiling and back down through another light fitting or duct in the next room.
Power points and similar penetrations can be soundproofed by bringing them out on a mounting block and plastering the hole in behind them. Light fittings need to be surface mounted rather than recessed, unless a solid box is fitted above them. Air conditioning ducts will always be a problem, but the problem is less if each room has an individual duct run from the A/C unit, rather than daisy-chaining ducts room to room.

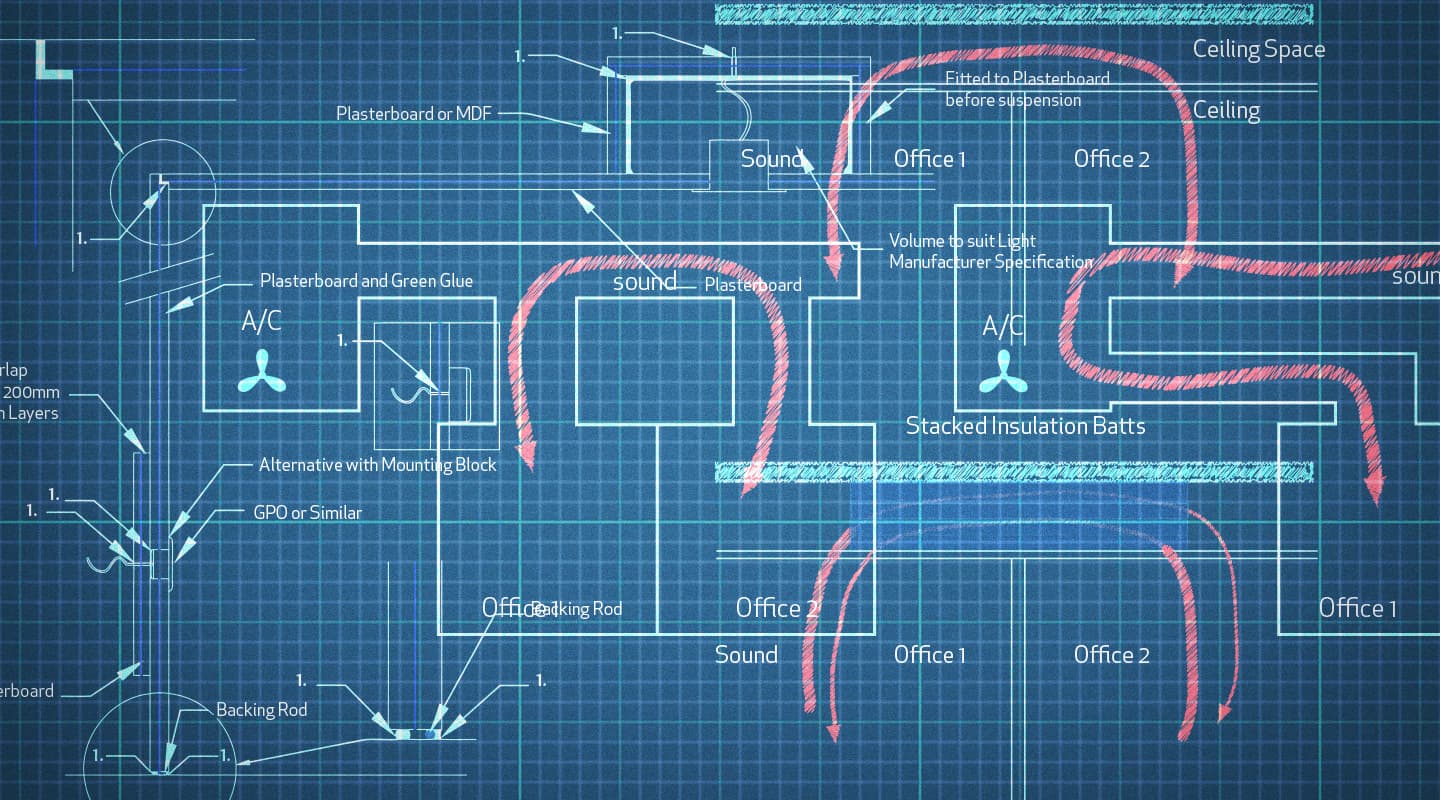
Without a barrier in the ceiling space sound is free to travel between rooms. By placing a barrier such as insulation batts or mass loaded vinyl in the space, higher levels of soundproofing can be achieved.

Some of the measures that can be taken to reduce the transmission of sound between rooms.
GOING THROUGH THE ROOF
A very commonly encountered problem is acoustic tile ceilings. These have porous tiles that let sound go through them, up to the underside of the floor above, and then back down. This affords quite a lot of absorption in the room, but of course isn’t very airtight. It gets to be a big problem when the walls of the room don’t go all the way up to the floor above (which is usually done to save on construction cost). In this case the room is about as soundproof as a tent.
The solution is to extend the walls up to the floor above, and there are a few ways to do that. You could actually build a continuation of the wall as constructed, but this is very difficult. More commonly, sheets of limp mass-loaded vinyl are hung from the floor above, down to the top of the wall. This is not a bad solution, although a bit labour intensive as the same airtight rules apply. There are also bundles of polyester batts that are layered up to be as high as the gap between the top of the wall and the floor above. They can be up to 600mm deep and are wedged into the gap for the entire perimeter if the room. Of course an alternative is to replace the porous ceiling with hard sheet plaster, then add acoustic absorbers back into the room.
“”
Once the key elements of good soundproofing are understood, it becomes clear where most of these rooms fail

Each room should have an independent air conditioning feed to avoid sound travelling between rooms through the ducting
HERMETICAL SEALS
Finally, doors need to be airtight or the sound will go out and around into the next room. Door seals are available to do this job and most can be retrofitted quite easily. We are assuming that these rooms don’t have windows between them – some things are just common sense!
So getting enough mass in the wall, damping the cavity and making the room airtight is basically what is required to tick the soundproofing boxes.
Good information on what sort and how much, is available from most of the manufacturers like Lafarge Plasterboard, Bostik, Fletchers Insulation etc. Beyond this, there are constrained damping materials like Green Glue, that can be applied between two layers of plasterboard. These materials go a step further and actually damp the wall itself, absorbing sound energy before it gets a chance to go any further. It is an effective way to increase the soundproofing performance of a wall. The material is simply applied to the back of the second sheet before it is screwed in place, and hence is suitable for both new and retrofit situations.
Retrofitting is quite common in offices where the need to improve soundproofing is recognised only after the premises have been occupied for some time. Many of the short cuts and cost saving measures common in the building industry are significant factors in poor soundproofing. It is of course more expensive to make these modifications after the fact, so the extra spent up-front will save significantly more time and money in the long run.


RESPONSES